It might just be me, but every time I transfer a patient from the operating table, i always catch at least one wire and somehow end up in a tangled mess. Wouldn't it be cool to have wireless monitoring? And design our own apps that meet our own needs? In this post, I will show you how to create a simple web app that monitors your pulse rate and oxygen saturations by "interrogating" a bluetooth pulse oximeter (I used the Viatom Bluetooth Fingertip Pulse Oximeter for 44 GBP).
You can watch a demo of the app on my not so famous YouTube account (I have one subscriber 🥳):
The demo app can be accessed here: https://anaesthetics.app/bluetooth/. If you have the Viatom bluetooth pulse oximeter, give it a try. All you need is a modern web browser that supports the Web Bluetooth API. Unfortunately, Google Chrome and Microsoft Edge are the only browsers who currently support this. You can find all of the source code on my GitHub repository.
To understand the code, you will need to have a good knowledge of HTML, CSS and JavaScript. I will eventually write a tutorial on how to make a web app, so I won't go into much detail about any of this here. This tutorial is more to show you how the Web Bluetooth API works and what can be done with the web today. Obviously, the app is not to be used in a clinical environment. In fact, it is pretty useless. Am I selling it to you...?
I am using Visual Studio Code as my source code editor and the only library I've used is LitElement. LitElement is very small and helps to build fast web components.
What are web components
Web components allow us to build our own html elements and are helpful to quickly create a dynamic user interface for an application. The great thing about web components is that you can re-use them in different projects. Just drop them in and they will just start working. All styles and common logic are encapsulated within the component, so it won't interfere with other parts of the website.
Web component are made up of three things: Custom elements, HTML templates and the shadow DOM. JavaScript is what glues them all together. Just like any other HTML element, they can be styled with css and configured by using attributes and properties.
LitElement reduces the amount of boilerplate required to create a web component. You have to write less code and save more time. If you are just starting to learn how to code, I would recommend you try without it first. After all, this is how you learn - writing plain JavaScript, and lots of it!
Other libraries and frameworks
You may have heard of other libraries, such as jQuery. Before the release of newer versions of JavaScript, jQuery made a lot of complex things much easier. Rather than writing a lot of code, you could just use a one liner which did the same thing. With more recent updates to JavaScript, native functions became available that pretty much did the same job as jQuery. This saves us from loading jQuery, as the browser needs to download the library and parse all the code everytime you open the website. This takes time and is more noticable on mobile phones. Remember, most people now browse the web on their phones and not all users have iPhones.
A lot of new developers want to start by learning a framework. The most popular ones you may have heard of are Vue, React and Angular. I would recommend you stay away from frameworks until you have a good understanding of JavaScript. There are a lot of frameworks out there and it can be very overwhelming to read all about them. You will find that by the time you have learned one of them, something new would have come along and you will have to start learning all over again. Coding with web components is much easier. They are close to the browser platform and are based on existing web standards. Therefore, they provide backwards compatibility, which means that web component build today will carry on working for years to come.
File structure
If you look in the repository, this is how the app is structured. You can copy all of those files to your website and they will just start working straight away. In my next blog post, I will discuss why this is a bad idea.
├─ src - source code folder where we keep all of our code.
├─── adapter
├───── viatom-pulse-oximetry.js - code to interpret data from our device
├─── logic
├───── bluetooth.js - Web Bluetooth API
├───── datetime.js - helpers to work with times
├───── sound.js - play alarm and beeping sounds
├───── wakelock.js - API to keep the screen on whilst connected to bluetooth
├─── mp3 - sound files
├─── main.js - entry file
├─── index.html
The index.html file loads main.js. This is the starting point, or the entry file. From there, all other JavaScript modules will be loaded, parsed, compiled and executed in the browser, whenever a vistor opens the websites.
Let's look at some code
Entry file
As mentioned before, the main.js file is where everything starts. The code will import all of our other JavaScript modules required to run the web app.
import { LitElement, html, css } from 'https://unpkg.com/@polymer/lit-element@latest/lit-element.js?module';
import { classMap } from 'https://unpkg.com/lit-html/directives/class-map.js?module';
import toggleConnection from './logic/bluetooth.js';
import audio from './logic/sound.js';
import wakeLock from './logic/wakelock.js';
It also renders the user interface of the app. It does so by creating a web component that I called demo-view. It is declared in the html file as a normal html tag
<body>
  <demo-view></demo-view>
</body>
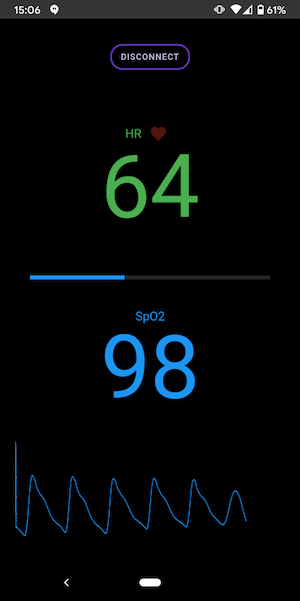
It has the following features:
- It displays the SpO2 and HR values as they change
- It draws the SpO2 trace by using a canvas html element
- It plays an alarm whenever the SpO2 or HR values are outside the normal range
It's called a dumb component because it doesn't do anything, it contains no logic. All it does is present some information to the html page and then moves on. It is JavaScript code outside the component that is responsible for changing the values of the oxygen saturations and heart rate. The component is completely de-coupled from the bluetooth logic, which allows us to re-use the component without making any changes.
The web component also renders a "Connect" button. When we click that button, it calls the _toggleConnection function inside the web component, which will then load the bluetooth code in logic/bluetooth.js. This is where the Web Bluetooth API is being used to connect and disconnect to a device.
In case you are wondering about those underscores, I use them before a function or variable to mark them as private. This tells me (and other developers) - don't touch it! It's supposed to be used within the web component only and shouldn't be manipulated by code outside the component. This means that we can change the code of a private function without worrying about breaking other JavaScript modules.
Differentiating between public and private tells us how data is manipulated and prevents bugs. For example, let's say I developed a really popular web component that changes the colour of the page. It's so popular, that other developers are using my component in their projects. Their modules are calling my public function inside the component to change the colour of the page from white to black. If I want to update my component to add some extra functionality and, by mistake, change the name of my public function (because I didn't know it was public), everything would break. External modules trying to call the function would throw an error. Worst case scenario, this could break the whole website and prevent it from loading.
Connecting a device
To view a list of bluetooth devices, we call the navigator.bluetooth.requestDevice function, which will bring up the device chooser. Turns out there are quite a lot of devices in my building and, without knowing the name of the device, it was rather difficult to find the correct one. If you want to find out what sort of wearables your neighbours are using, go to chrome://bluetooth-internals/ and it will also help you to find the name of your device.
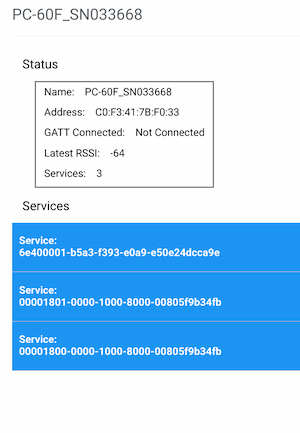
To make our app more user-friendly, I filtered out devices and services that are not relevant. This can be done by using the filters and optionalServices properties. The Viatom pulse oximeter is called PC-60F_SN033668 and has the service identifier 6e400001-b5a3-f393-e0a9-e50e24dcca9e. We are declaring those in the SERVICE_UUID and DEVICE_NAME variables at the beginning of the script.
const SERVICE_UUID = '6e400001-b5a3-f393-e0a9-e50e24dcca9e';
const DEVICE_NAME = 'PC-60F_SN033668';

device = await navigator.bluetooth.requestDevice({
  filters: [{ name: DEVICE_NAME }],
  optionalServices: [SERVICE_UUID],
});
Now we need to connect to the Generic Attribute Profile (GATT) server of the peripheral bluetooth device (pulse oximeter), which will allow us to transfer data back and forth. Once connected, the pulse oximeter will stop advertising so that only one central device (your phone, tablet, laptop) can connect to it. The GATT server advertises the supported services and characteristics of the bluetooth device. Unfortunately, cheaper devices like the Viatom only use custom services and characteristics.
More expensive devices contain standardised profiles, which makes it much easier to read data, such as heart rate, blood pressure, glucose monitoring or, for anaesthetists, cycling power profiles (https://www.bluetooth.com/blog/part-2-the-wheels-on-the-bike-are-bluetooth-smart-bluetooth-smart-bluetooth-smart/).
A profile contains a set of services which are differentiated from each other by a unique service identifier (see above). A list of services is found here. Things we would be interested in are the Heart Rate and Pulse Oximeter services, but as mentioned before, the Viatom only uses custom services so we have do some reverse engineering to interpret the data and make sense of it.
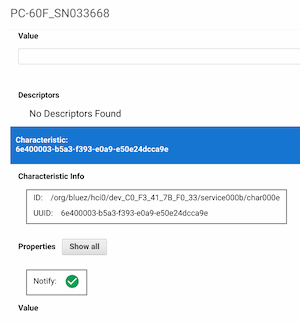
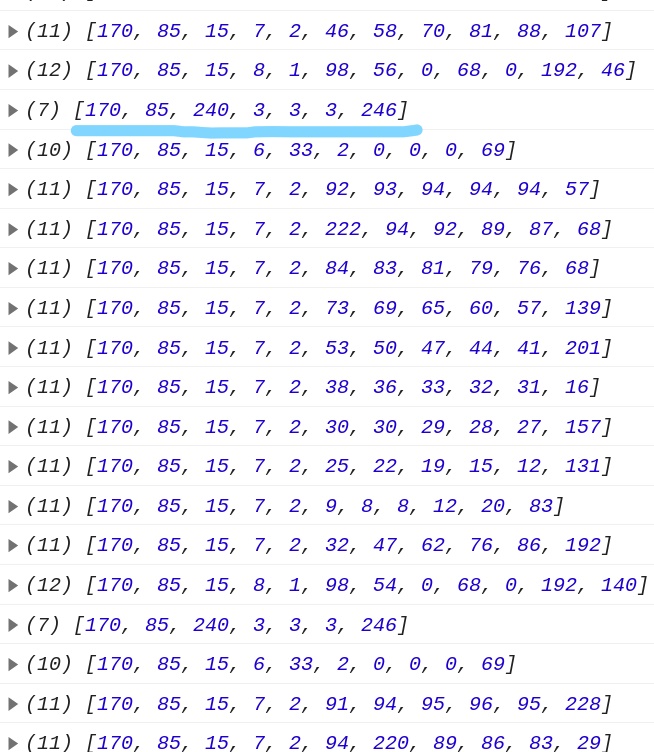
Each service contains one or more characteristics. Some services, like a heart rate one, only have a single characteristic whilst other services can contain a collection of characteristics. A charactertic usually stores a set of values and this is what we are interested in as it contains the data for our heart rate and oxygen saturations. Characteristics also have a unique identifier, but for our use case, it's not as important to know the exact id. When inspecting the characteristic, I'm looking for the one that notifies. From the screenshot, you can see that this is the second characteristic, so the first array index (arrays start with 0).
const server = await device.gatt.connect();
const service = await server.getPrimaryService(SERVICE_UUID);
const characteristics = await service.getCharacteristics();
const oximetry = characteristics[1];
Now that we are connected to the GATT server and have our characterstic, the bluetooth device will transmit a stream of data. To get this data, we need to listen to the characteristicvaluechanged event. This event will continuously pass the values of the characteristic into the handleData function, which is here where all data is being parsed and interpreted. The handleData function is found in in the adapter/viatom-pulse-oximetry.js file.
oximetry.addEventListener('characteristicvaluechanged', handleData);
oximetry.startNotifications();
Handling data from a characteristic
This is the point where we have to do some reverse engineering as we don't know the specification of the device. The device will send an array of data which looks something like this.
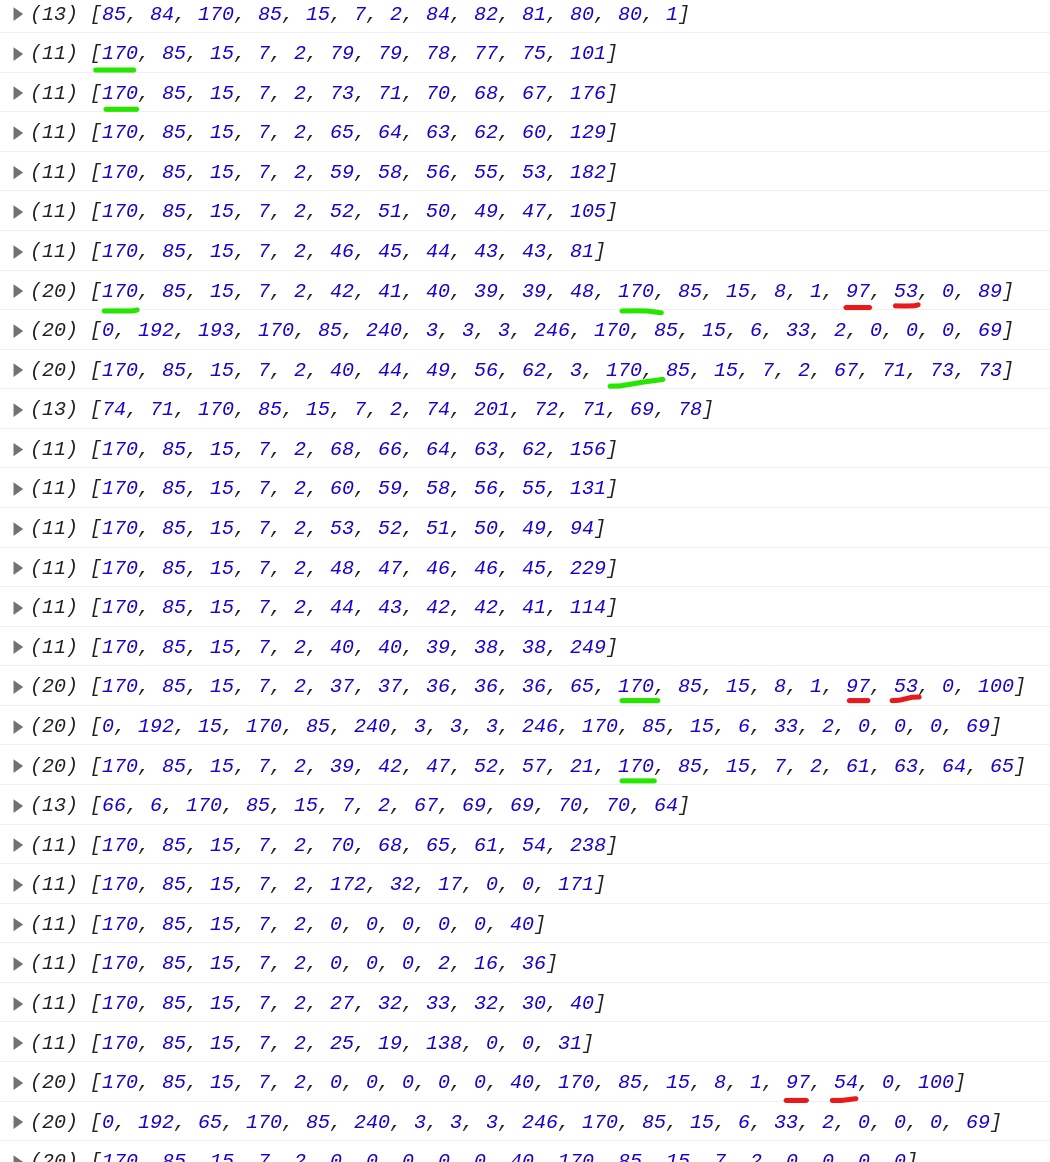
Those numbers are bytes and each byte can hold a value between 0 and 255. This is quite handy as our heart rate will hopefully be less than 255. I know my heart rate is 53 (all that running finally paying off) and my oxygen saturations are 97, so all I have to do is go hunt for them.
As you can see, numbers per row can change and the heart rate and saturation values are in random places. To find out where data starts and ends, we just look for patterns. 170 is always repeated and is likely the flag that indicates the start of a block of data. To visualise the data more easily, I created a function which will create a new block of data everytime the number 170 is encountered.
const NEW_LINE_FLAG = 170;
function handleData(e) {
  const t = e.target;
  let receivedData = new Uint8Array(t.value.byteLength);  // t.value.byteLength how many bytes are there?

 // loop through each byte
  for (let i = 0; i < t.value.byteLength; i++) {
    receivedData[i] = t.value.getUint8(i);
    const value = t.value.getUint8(i);
    if (value == NEW_LINE_FLAG) {
      // if we find 170, parse data and start a new line/cache
      parseData(cache);
      cache = [value];
    } else {
      // if not 170, keep looking but store each value in our cache so we can use it once we find our number
      cache = [...cache, value];
    }
  }
}
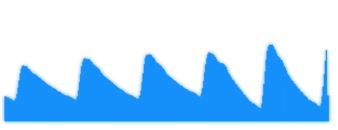
Now our data looks something like this:
We can see our SpO2 and HR values but all the other numbers just puzzled me. Looking at patterns again, you can see that values are increasing until there is a peak and then decreasing again. I decided to plot those numbers in a graph and this is what it looked like - our SpO2 trace!
To summarise,
- First element or our array (index 0) is a new line flag
- Fourth element of our array (index 3) determines the type of data we are looking at
- 7 indicates that the data contains the SpO2 trace
- 8 indicates that the data contains our vital signs and
I have no clue what 3 or 6 are for, if you find out, let me know! But we are unlikely to need those so I stopped engaging my brain at this point.
function parseData(arr) {
  console.log(arr);
  switch (arr[3]) {
    case 3:
    case 6:
      return;
    case 7:
      parseSignal(arr);
      return parseGraph(arr.slice(5, 10));
    case 8:
      return parseVitals(arr);
    default:
      console.error('unknown flag', arr);
  }
}
Extracting heart rate and saturation
We know that we are dealing with our vitals if the fourth element of our array contains the number 8. In that case, the values for SpO2 and HR are always found in array index 5 and 6, respectively. Based on this, the function below updates the SpO2 and HR values in our web component as they change. Every minute, it will also add those values to a table, which is found in the demo-view web component (you have to scroll down).
function parseVitals(arr) {
  const now = timely().format('HH:mm');
  const sats = arr[5];
  const bpm = arr[6];

  demo.sats = sats;
  demo.bpm = bpm;
  if (now !== previousMinute) {
    previousMinute = now;
    dataTable = [[now, sats, bpm], ...dataTable];
    demo.data = dataTable;
  }
}
Drawing the SpO2 trace
This function draws the graph by passing the values into the canvas html element which is found inside the web component. Sometimes we are getting a spike of large numbers which I assume is artifact and I filter those values out. If the value is more than 80 then we will create a beeping noise - this can be done much better but I haven't got the time right now!
function parseGraph(arr) {
  arr
  .filter((int) => int < 150) // filter anomalies
  .map((int) => {
    if (int > 80) audio('beep', true);
    demo.beep = int / 150;
    const height = int;
    yAxis = demo.drawLine(xAxis, yAxis, height);
    xAxis++;
    if (xAxis > 300) xAxis = yAxis = 0;
  });
}
And this is it! 🎉
We have successfully created the logic to connect to the bluetooth device, get all its data and interpret it. We then send the data to the web component, which updates the html so we can continuously see all the changes as they happen.
Is it not easier to use the app that comes with the device?
First of all you have to find the app. The Viatom manual didn't say what the app was called or how to download it. When I searched for Viatom in the Play Store, there were three different apps that all seem to do the same thing. And all of them were about 40MB big. They also ask for random permissions and are probably collecting all your data in the background. This will slow down your device and drain your battery. Native apps these days are really bad. A web app is only a few kb in size, it's fast and doesn't drain your battery. As you have designed them yourself, you know that there are no privacy issues and no one is spying on you.
Tips for new developers
- Plan and structure your projects
- I wouldn't recommend jQuery - you can do most of it using the latest JavaScript, which is supported by all modern browsers
- Stay away from frameworks as long as you can
- Once you have a good understanding of JavaScript, try LitElement