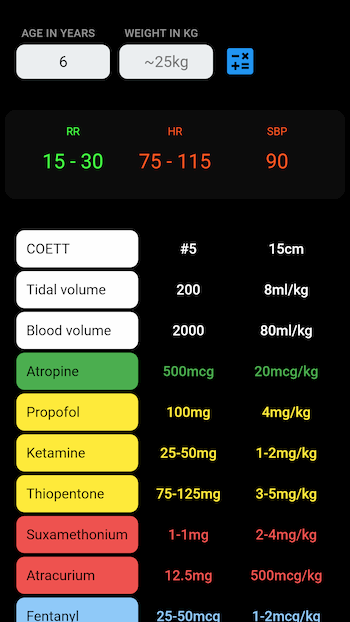
It's been a while since my last blog post about creating a bluetooth web app. I have been thinking about what else I could create that's useful, easy to understand and that doesn't require a bluetooth saturation probe. After looking through my cloud storage, I stumbled onto an old project of mine - a drug calculator from a few years ago. So I thought, why not build something with that?
You can find the repository here: https://github.com/anaestheticsapp/calculator/
A quick note on medical device registration
Drug calculators are classed as medical devices and have to be registered with the Medicines and Healthcare products Regulatory Agency (MHRA) in the UK. The web app at the link above is intended for demonstration only and will change as the tutorials progress. The calculator is not supposed to be used in a clinical environment and the formulas have not been tested. The demo app just serves one purpose - to show you the end product after each tutorial and to highlight some issues when building a web app. You can, of course, follow the tutorials and build your own app for personal or in-house use.
Software is a medical device when it is intended to be used for the diagnosis, prevention, monitoring, treatment or alleviation of disease. Registering an app as a medical device is a lengthy process that requires a lot of time and effort. This process will become more complex in the future as the law for medical device registration will soon face major changes. Unfortunately, this will make it more difficult to certify apps due to the up-classification of medical device software.
Currently, most stand-alone software is classified as Class I. These are low risk devices and require clinical evaluation, technical documentation, completion of a conformity assessment, and registration with the MHRA.
The new medical device regulation significantly changes the classification for medical apps: "Software intended to provide information which is used to take decisions with diagnosis or therapeutic purposes is classified as class IIa" (medium risk). This pretty much applies to most medical software. Class IIa devices require the involvement of a notified body to ensure that the app can receive a CE marking. The costs for conformity assessment procedures for Class IIa devices are about 270 GBP/hour for the quality management system asssessment and about 360 GBP/hour for the assessment of technical documentation. It's probably one of the reasons why medical devices are so expensive despite being relatively cheap to manufacture.
Medical software will be classified as
- Class IIb if decisions have an impact that may cause serious deterioration or a surgical intervention (includes software that monitors vitals signs in anaesthesia or critical care and probably a variety of risk calculators) and as
- Class III (high risk) if decisions may cause death or an irreversible deterioration of a patient's condition.
File structure
├─ src - source code folder where we keep all of our code.
├─── logic
├───── calculations.js
├─── main.js - entry file
├─── index.html
Using LitElement to build Web Components
As with the bluetooth app, I'm using web components to create the calculator web app. I will go over the basics here, but you should really read the LitElement documentation to find out how it works in more detail.
To get started, we need to import the LitElement library into our JavaScript entry file /main.js. This can be done by using unpkg.com, which is a free content delivery network (CDN) for npm packages. It will allow us to use packages like LitElement without building or compiling them. It's a good way to get started when you are just learning how to code with JavaScript.
import { LitElement, html, css } from 'https://unpkg.com/@polymer/lit-element@latest/lit-element.js?module';
Web components are made up of custom elements. It allows us to use custom tag names in html documents. So when we add <calculator-view></calculator-view> to an html file, it will render the web component. Custom elements can be defined by using the code below:
class CalculatorView extends LitElement {
  // code for web component...
}
customElements.define('calculator-view', CalculatorView);
Now that we defined our custom element, we need to understand the structure of a simple LitElement component.
class CalculatorView extends LitElement {
  static get properties() {}

  constructor() {}

  render() {}

  static get styles() {}
}
customElements.define('calculator-view', CalculatorView);
The first function I want to focus on is the render method. When you add <calculator-view></calculator-view> to your html file, it's the render method which is responsible for rendering the web component. It uses an html template literal to create DOM nodes and appends them to a DOM tree. The easiest way to render a component is to use static html in the html template. Most of the time, you want to render dynamic text content though. This can be achieved by using JavaScrip expressions ${...} within the html template. In the calculator web component, I'm using those expressions to
- Render further html templates
${this._renderForm()}, - Add properties to the template, such as
this._calculationsandthis._vitals - Iterate over arrays using the map() method, for example
this._calculations.map(item => ...) - Render certain html based on a Boolean condition (if there are no elements in the
this._calculationsarray ie length === 0, render another html template. If not, do nothing)${this._calculations.length === 0 ? render another html template : do nothing
render() {
  return html`
    ${this._renderForm()}
    ${this._calculations.length === 0
      ? html`
          <div class="label">Weight is estimated based on age if actual weight is not known</div>
          <div class="label">This is a demo app and not to be used clinically</div>
          <div class="label">Created by AnaestheticsApp</div>
        `
      : ''
    }
    <output class="flex">
      ${this._vitals.map(item => {
        return html`
          <figure class="${item.class}">
            <figcaption>${item.title}</figcaption>
            <span>${item.dose}</span>
          </figure>
        `;
      })}
    </output>
    <output class="grid">
      ${this._calculations.map(item => {
        return html`
          <div class="drug-label ${item.class}">${item.title}</div>
          <div class="drug-dose ${item.class}">${item.dose}</div>
          <div class="drug-dose ${item.class}">${item.formula}</div>
        `;
      })}
    </output>
  `;
}
Properties being used in the template should be defined in the constructor of the component. This ensures that the component is rendered correctly when it is first initialised. Otherwise, you will see a lot of "undefined" when you first open the website.
constructor() {
  super();
  this._estWeight = ''; // empty string
  this._calculations = []; // empty array
  this._vitals = [];
}
We can also observe these properties by binding them to the template. Whenever a property changes, the render function will be called again. The great thing about LitElement is that it only updates parts of the template that have changed, making it very fast.
static get properties() {
  return {
    _estWeight: { type: String },
    _calculations: { type: Array },
    _vitals: { type: Array },
  };
}
The properties can change multiple times, so it's important to make sure we don't use any logic in the render function, otherwise, performance may suffer. For example, if you perform a lot of complex calculations in the render function, it will slow down or block the website every time a property is updated. This could potentially make the website unusable.
As mentioned before, we render another html template inside the main template by calling the renderForm() method. We could insert that content into the render() method instead, but it would make the code more difficult to read and follow. Seperating your code into little, custom named functions will help other people to understand what you are writing.
The main objective of the renderForm() function is to deal with the form submission. When you submit a form, form values are sent to the server. Usually, this will reload the page or open the url specified in the action attribute. In our case, we don't want this to happen as a) we don't have a server and b) we want to make sure our app works offline as well. Having a server perform the calculations won't allow this to happen. Instead, we can listen to the submit event that is fired once the submit button is clicked. To listen to events in LitElement, we just use the @-prefix. In our web component, we add @submit="${...}" to the template which will call the this._btnSubmit() function and intercept the submit event. We are also using the input event listener to update the this._estWeight property and to clear any calculations whenever the input fields are updated.
renderForm() {
  return html`
    <form id="formCalc" @submit="${this._btnSubmit}">
      <section>
        <div>
          <label for="age">Age in years</label>
          <input
            type="number"
            name="age"
            placeholder="Years"
            @input="${this._updateEstimatedWeight}"
          />
        </div>
        <div>
          <label for="weight">Weight in kg</label>
          <input
            type="number"
            name="weight"
            placeholder="~${this._estWeight || ''}kg"
            @input="${this._clearCalculations}"
          />
        </div>
      </section>
      <button type="submit" class="calc-submit" id="calc-submit">
        <!-- svg icon -->
      </button>
    </form>
  `;
}
The _btnSubmit function prevents opening a new page and sending values to the server by calling event.preventDefault(). We then get the form values, so age and weight (if entered), and perform the calculations (not shown but are in the repository). The calculations will update the this._vitals and this._calculations properties, which are observed by LitElement. Any change to the properties will call the render function and update the template with the new properties.
_btnSubmit(e) {
  // prevent form submission
  e.preventDefault();

  // get form values
  const formData = new FormData(e.target);
  const age = formData.get('age');
  const weight = formData.get('weight') ? formData.get('weight') : this._estWeight;

  // logic for our calculations here
}
Now that we can 1) render our form using the render() method, 2) submit the form by listening to the submit event and 3) render the calculations by using the code in the this._btnSubmit function, we have a minimal viable product. It works, but it doesn't look pretty. What we can do now is style our web component by using CSS templates. This pretty much works like using CSS stylesheets that you use in your html document. The advantage here is that all styles are encapsulated within the component and won't interfere with any other styles in your html file. The only css selector you may not have come accross is the :host pseudo-class. The pseudo-class will allow you to define the default styles of the web component, such as font-color and background-color. While styles inside the component cannot leak out of the component, styles from outside the component (from your html document) can leak into the component and overwrite styles declared in the :host pseudo-class. This will allow other developers to customize your web component by using the css selector calculator-view.
// in your html file
<style>
  calculator-view {
    font-color: black;
  }
</style>

// in your component
static get styles() {
  return [
    css`
      :host {
        display: block; // the default is display: inline-block
        font-color: white; // overwritten above - font-color will be black instead
        background: blue;
      }
      div {
        font-weight: 500;
      }
    `,
  ];
}
This part of the tutorial was all about creating web components. As mentioned before, you must read the LitElement documentation and play around with it, creating your own web components. Start small and try to re-create the calculator-view web component by yourself. I didn't go over the calculations on purpose as they are not that exciting. You can have a look at them in the repository, they are found in the /logic/calculations.js file. If you find it difficult to understand them, let me know and I will explain them in more detail in the next tutorial. Any questions, please let me know on twitter and I will try and answer them.